
What the MoT requires of your car and what you can do to ensure your car passes.
The MoT test, named after the Ministry of Transport who were responsible for introducing the test in 1960, is designed to ensure minimum standards of safe operation of any vehicle used on the road.
Many of the checks carried out in an Mot test can be replicated by the average motorist at home.
By following our guide, and learning what the MoT test demands of your car, you can help ensure your car passes the test first time, or, at the very least, learn the deficiencies your car has that will cause it to fail - information that will prove valuable when the mechanic is talking money and how much it will cost to put things right.
It is important to remember that parts of the test rely of the personal judgment of the person carrying out the test, such as deciding whether wear in a component is enough to result in failure. When taking such issues into account, VOSA's guidelines demand a component fails if:
"...it has reached the stage where it is obviously likely to affect adversely the roadworthiness of the vehicle..." or
"...whether the component has clearly reached the stage when replacement, repair or adjustment is necessary."
These are checks any motorist can make regardless of experience. Such checks make up around 30% of faults logged with VOSA on cars that fail the MoT, so making these checks could save you time and money.
The following checks are the easy checks any motorist can make at home.
Vehicle Identification Number Check

Cars built after the 1st August 1980 will be subject to a Vehicle Identification Number (VIN) Check. The VIN number will usually be stamped on a metal plate under the bonnet, into the bodywork or in the floor next to the sill. Often they're will be more than one VIN plate to find.
The VIN number must be clear and easy to read, and untampered with. All cars must have at least one VIN plate which is securely fastened to the car.
Numberplates
All numberplates must be present, secure, and the correct colour for their position - white with black letters/numbers on the front and yellow with black letters/numbers on the rear. The backgrounds must be plain. All plates must be legible from 20 metres. Cracks, delamination, fading and even plates being too dirty can cause your car to fail.
Sidelights
Headlights
The position, size and output of the headlights must match, and they must be securely mounted to the body of the car. You can check this yourself by placing a hand across the glass cover and gently pressing left and right, then up and down. There should be no movement either way, unless the headlights have a adjustment facility in the car, which will mean they are spring loaded, then you may feel a slight movement, but this won't cause a fail.
The headlight cover must be in good repair. Anything that alters the pattern of light passing through the cover, such as cracks, holes or even scratching could cause a fail.
Inside the headlight, check the silvering for rust or de-lamination, as such defects can also affect the light pattern.
The light emitted be the headlights must not be soft-edged or vague. Such a defect is usually caused by the bulb being incorrectly fitted in the holder, so remove it and check.
The switch inside the car that operated the headlights must be in good order and be positive in its action - having to jiggle it to turn the headlights on/off will result in a fail.
The lights must switch between dip and main beam promptly, not leaving both on at any time.
A dashboard light indicating that the headlights are on main beam must be visible from the driver's seat.
If the car has HID headlamps they may have a leveling and cleaning system, which will be checked for operation and efficiency. If the system doesn't work the car will fail.
Headlight Aim
The MoT test station will be able to accurately test the aim and pattern of the headlights. To some extent, you can replicate this test at home by measuring the height of the centre of your headlamps and their distance apart, then marking a wall to match. Then park the car about six feet away from the wall and turn on the main beam (this is best done in low light levels to allow maximum contrast). The main intensity of each beam should be on the marks that were made, or just below the centre point as measured. Turn your lights to dip, the beam should now drop to the left-hand side, but remain symmetrical. Any discrepancies between the light cast by the two beams must be rectified.
It is should be possible to adjust the lamps by using the screwed rods at the rear of the lamp, with the light still shinning on the wall as a guide. This can be a time-consuming and awkward process, which may be best left to the mechanic doing the MoT.
Stop and Tail Lights
If any light isn't working, or if any emits low light levels, check that the bulb is fitted correctly and replace any that have blown.
Next you need to check the brake lights continue to work regardless of what other lights are on - sometimes, due to electrical circuit errors, the brake lights won't work if, for example, the indicators are activated.
Turn on your sidelights and press the brake pedal. Both sets of lights should work and remain unaffected by the other. Repeat the test with the headlights on dip and main beam, and then the indicators - left, right and hazard. If you find any light is dim or flashes poorly, it may be that it has a bad earth. To rectify, clean and lubricate all the connections on the affected light unit and repeat the test.
Numberplate Light
Common reasons for test failure are corrosion to the bulb terminals and blown bulbs
Rear Reflectors
There should be two red reflectors, one on each side, securely mounted symmetrically facing to the rear. These are often built into the rear light units. They must be securely fitted, and must not be excessively damaged.
Indicators and Hazard Lights
The indicators lights must be securely mounted and function correctly. The lens covers must be in good repair. If your car was built after April 1986 it must also have side-mounted indicator lights that function correctly and are in good repair. The light emitted from these units must be amber, either from the lens itself or from a yellow coloured bulb, fading of either type will result in a fail.
The indicator switch must be positive in action and undamaged. When the indicators are turned on a dashboard warning light must show, or an audible warning light must sound.
The lights must flash between 60 and 120 times a minute. If they don't a replacement flasher relay unit will resolve the problem.
Turn on the hazard warning switch - make sure the correct dashboard warning light comes on, and that all indicator lights flash in unison.
Rear Foglight
Your car should have a rear foglight that is fitted to the centre or offside rear of the car. It must have a red lens and a dashboard warning light must show when the foglight is switched on. You should check that the foglights works when all other lights are also switched on. As with all lights, the lens and fittings must be in good repair.
Windscreen
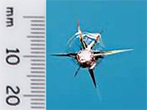
The windscreen will be checked for chips, cracks and other damage. The areas of most concern are, the section swept by the wipers during normal use, and the smaller area in front of the driver (29cm wide and centred on the steering wheel). Any damage in this smaller section must be contained within a 10mm diameter circle to pass - the chip in the image below is larger than 10mm so would fail. In the larger section, any damage must be contained within a 40mm diameter.
To repair a crack or chip that would fail your car, you can use a windscreen repair company that will use a chemical injection to repair the damage.
Nothing should be stuck to the inside or outside of the windscreen that seriously obstructs the driver's view.
Heavy scratching to the windscreen can result in a fail, as can sun visors that won't stay in the 'up' position.
Mirrors
Any car that built after 1st August 1978 should be fitted with at least two mirrors. One must be a driver's side exterior, the other can be either an exterior side mirror on the passenger's side or an interior mirror.
All mirrors must be secure, and without damage that seriously impairs the view to the rear. If your mirrors are cracked or cloudy it is probably wise to replace them. You can buy stick-on replacement mirror glasses quite cheaply, which mean you won't have to replace the whole mirror unit.
Mirrors should be visible and adjustable from the driver's seat.
If the car has rear view cameras instead of mirrors the system must provide a view to the rear that is clear an unobscured, otherwise the car will fail.
Washers
The operation switch must work. The pump must supply sufficient liquid to clean the screen when used with the wipers. If not enough liquid is being supplied, a weak pump or blocked hoses/jet heads are likely to be the cause. A blast of compressed air will often clear blocked hoses, and a pin will often clear a blocked jet head, and, as jet heads are often pivoting metal balls inside plastic housing, a pin can often change the position of the jet heads if the water jet is misalignment and not hitting the screen as it should.
Fill the washer reservoir right to the top before you take your car to be tested.
Wiper Blades
The Horn
Dashboard Lights
These lights will be tested for their presence, when the engine is turned on they should illuminate. They will then be tested to make sure they extinguish correctly and that no light remains on to indicate of a fault to the car.
If your car has the following warning lights fitted they will also be tested to make sure they are working.
Speedometer
Air Bags
If the car has air bags fitted, then they must still be present and not obviously defective.
Tyres and Rims
Tyres on the same axle must match. Check the tyre wall writing i.e. 155/65 R 15 and make sure that the first two numbers, which signify the 'aspect ratio' of the tyre, are the same for each tyre.
The condition of each tyre will be checked - cuts, cracks or bulges in the sidewall are likely to result in a fail. Cuts to the tyre will definitely result in a fail if they are more than 25mm long or expose any part of the tyre's inner structure - cords or steel.
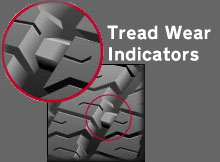
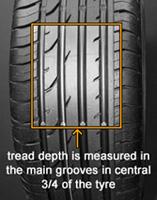
The tyre tread must be at least 1.6mm deep across the middle three quarters of the width, all the way round.
The rim joint of the tyre will be checked to make sure that the tyre is correctly fitted.
The valve stem must be in position and not adversely damaged.
The tyre must not touch any part of the car it isn't supposed to.
The spare tyre will not be tested.
The wheels, when spun, must not be noticeable out of round (buckled).
The wheel must be securely and correctly fitted.
The rims must not be dented, cracked or show other signs of serious damage. Steel rims can have small dents knocked out by using a hammer, although alloys will need to be replaced or repaired by a specialist.
Elongated mounting holes, missing wheel nuts or studs all result in a fail, although the tester will not remove caps or trim to check.
If you have a spare wheel that is fitted to the exterior of the car, then it must be securely attached.
Tow Bars
Any damage or wear considered to be impairing the safe use of a tow bar or fittings will result in a fail. Electrical sockets should work, and can be failed for damage.
Now read Part 2 - The Slightly Harder MoT Checks To Make At Home